In this tutorial we will teach you how to create creative and stylish fire lines in easy steps using Photo Shop cs3. Using these techniques you can create awesome illustrations and different techno effects. For this tutorial your going to need a good stock photo lined up. Something with action…and preferably dark (this effect works much better in a dark setting) So click a phtoto in the dark.
STEP 1
STEP 2
A. Click to start your path B. Click your next point, hold and drag to create a bezier spline path, which is necessary to create flowing lines C. Continue doing this, following the idea of where you want the fire to go. Dont worry about getting it right the first time as you can change the spline at any time…another little tip – if you press press and hold ctrl while using the pen tool you can temporarily access the direct selection tool which will allow you to edit the spline (a big time saver)
STEP 3
And eventually…you get something like what i have below….now remember that your only going to use the parts of ur path that aren’t behind the object your pathing along….in this case the models arms, and legs. So dont worry about making the hidden parts pretty.
STEP 4
STEP 5
You should immediately see the stroked path. On mine you’ll see parts that weren’t originally pathed that are now there. Those give the fire the illusion that it is moving, and were accomplished by simply grabbing the clone stamp tool – using a spatter brush and cloning/stamping.
STEP 6
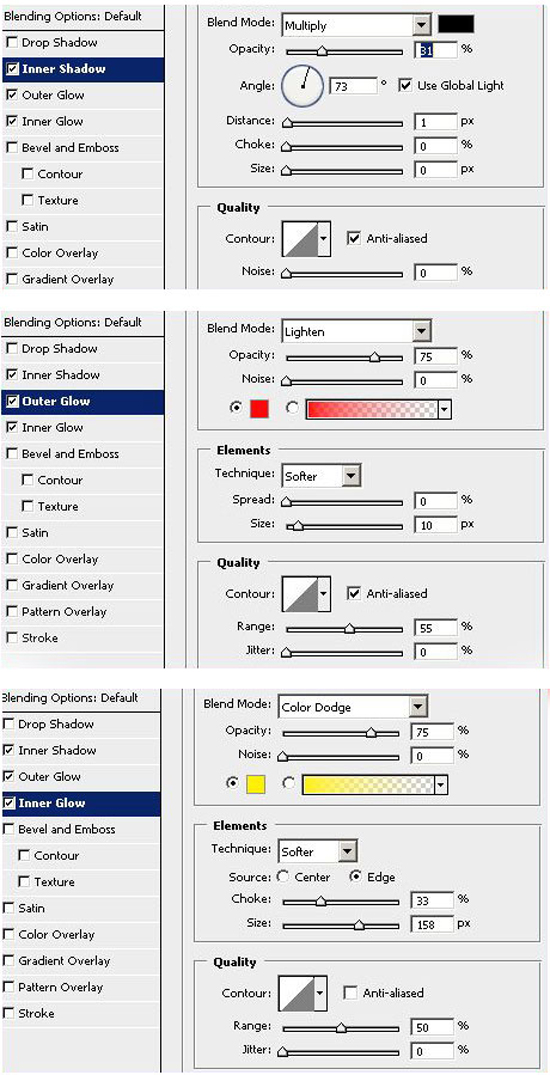
Erase the parts behind the legs/arms or whatever it is your paths follows. Right click on the FIRE layer and select blending options. Use these options/values for the exact product i got…but your free to play with them, (thats how i discovered this technique) you might end up with something better!
STEP 7
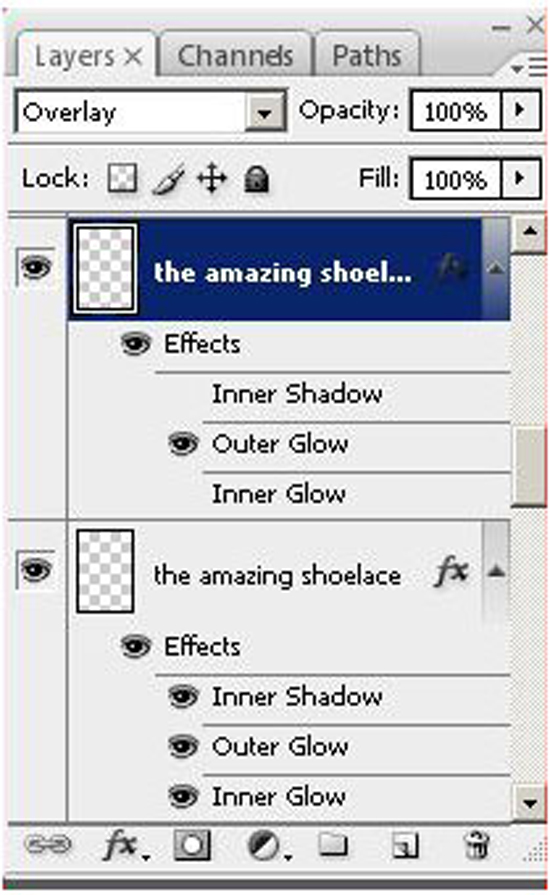
Duplicate the FIRE layer, and set the layer mode to OVERLAY Click the eye next to inner shadow and inner glow on the duplicate layer to deactivate them.


STEP 8
Now double click on outer glow on the duplicate and change the values to this.Spend a little time, and you can make something like what i have below…
Open the photo, then go to the paths tab and click create new path (A) . Press “P” on the keyboard to select the pen tool, Get a basic idea of where the fire is going. Keep in mind dimension and action. Swirls do wonders!
STEP 2
A. Click to start your path B. Click your next point, hold and drag to create a bezier spline path, which is necessary to create flowing lines C. Continue doing this, following the idea of where you want the fire to go. Dont worry about getting it right the first time as you can change the spline at any time…another little tip – if you press press and hold ctrl while using the pen tool you can temporarily access the direct selection tool which will allow you to edit the spline (a big time saver)
STEP 3
And eventually…you get something like what i have below….now remember that your only going to use the parts of ur path that aren’t behind the object your pathing along….in this case the models arms, and legs. So dont worry about making the hidden parts pretty.
STEP 4
A. Now you want to select a soft round brush (i used a 5 pixel brush here) and pick an orange color.
B. Make a new layer and name it FIRE (I have mine named The Amazing Shoelace)
C. Go back to the paths tab and select stroke path with brush.
STEP 5
You should immediately see the stroked path. On mine you’ll see parts that weren’t originally pathed that are now there. Those give the fire the illusion that it is moving, and were accomplished by simply grabbing the clone stamp tool – using a spatter brush and cloning/stamping.
STEP 6
Erase the parts behind the legs/arms or whatever it is your paths follows. Right click on the FIRE layer and select blending options. Use these options/values for the exact product i got…but your free to play with them, (thats how i discovered this technique) you might end up with something better!
STEP 7
Duplicate the FIRE layer, and set the layer mode to OVERLAY Click the eye next to inner shadow and inner glow on the duplicate layer to deactivate them.


STEP 8
Now double click on outer glow on the duplicate and change the values to this.Spend a little time, and you can make something like what i have below…
After all these steps you'll get like this. Hope You like it..!!


0 comments:
Post a Comment